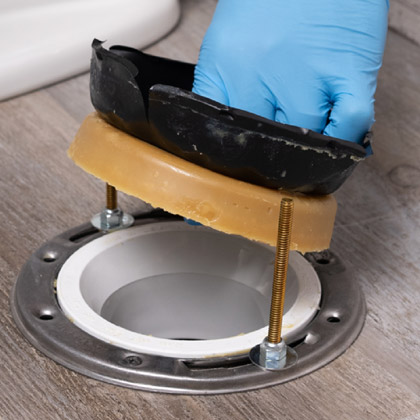
How To Replace A Toilet Wax Ring
A toilet wax ring might be out of sight, but it plays a big role in keeping your bathroom clean and odor-free. This simple ring creates a watertight seal between your toilet and the drain pipe below it. Over time, that seal can break down, leading to unpleasant smells, leaks, or even water damage. While learning how to replace a toilet wax ring sounds like a quick fix, it’s a task that involves heavy lifting, dirty work, and a good understanding of plumbing. This is a job better left to the professionals at Oliver.
Replacing Your Toilet Wax Ring
Step 1: Shut Off The Water Supply
Before anything else, turn off the water valve behind your toilet. Then, flush the toilet to drain as much water as possible. You’ll probably still have some water left in the tank or bowl, so have a bucket and sponge handy to soak up the rest.
Step 2: Disconnect The Water Line
Next, you’ll need to detach the water supply line from the bottom of the toilet tank. This step can get messy, especially if the fitting is stuck or if there’s residual water left in the hose.
Step 3: Unbolt The Toilet
Use a wrench to remove the bolts that secure the toilet to the floor. These can sometimes be rusted or corroded, which adds time to the process. Once the bolts are out, gently rock the toilet back and forth to break the seal, then lift it straight up and move it out of the way. It’s important to keep in mind that toilets are heavy and awkward to carry. It’s easy to hurt your back or crack the porcelain if you’re not careful.
Step 4: Remove The Old Wax Ring
Now it’s time to scrape away the old, often messy, wax ring from the flange on the floor. This is one of the least pleasant parts of the job. Check the flange for damage, because if it’s cracked or uneven, you’ll need to repair or replace that, too, before continuing.
Step 5: Install The New Wax Ring
Place your new wax ring onto the flange or onto the bottom of the toilet, depending on the type. Align the toilet with the bolts and carefully lower it straight down onto the ring. Wiggle it slightly to help form the seal, but don’t overdo it.
Step 6: Reconnect Everything
Tighten the bolts, reconnect the water line, and turn the water back on. Once the tank fills, give it a flush and check for leaks around the base. If everything looks good, you’re done, but if anything feels off or you spot moisture, you’ll want to double-check your work, or better yet, call Oliver.
Why Leave It To The Pros At Oliver?
Replacing a wax ring isn’t just a matter of swapping out a part, as it involves water, weight, and a bit of plumbing know-how. Doing it wrong can lead to leaks that rot your subfloor or cause lingering sewer smells in your bathroom. At Oliver, we handle these kinds of repairs all the time. Our experienced plumbing team can replace your wax ring and inspect for other issues quickly and cleanly, without the hassle or mess.

Tools Needed
- Adjustable wrench
- Sponge and bucket
- Putty knife
- Rubber gloves
- Old towels
- New wax ring
- New toilet mounting bolts (optional)
Contact Oliver’s Plumbing Experts Today
DIY projects are great, but learning how to replace a toilet wax ring can be a difficult task. If your toilet is leaking at the base or rocking when you sit down, don’t wait for a small issue to become a big one. Contact Oliver online today and let our licensed plumbers take care of your wax ring replacement with confidence and care.


