How To Install A Smart Thermostat For Better Home Heating
Smart thermostats have become a must-have upgrade for homeowners looking to improve comfort and energy efficiency. These innovative devices allow you to control your home’s heating remotely, learn your habits, and even adjust temperatures automatically to save energy. Whether you’re replacing an old programmable thermostat or switching from a basic manual model, learning how to install a smart thermostat for better home heating can be a manageable DIY project. However, it’s always better to leave this task to HVAC professionals, like the experts at Oliver.
Step-by-Step Smart Thermostat Installation Guide
Step 1. Turn Off Power To Your HVAC System
If you’re planning on tackling this task yourself, safety always comes first. Head to your home’s electrical panel and switch off the breaker that controls your heating and cooling system. This prevents electrical shock and protects your thermostat wiring. Use a voltage tester to confirm that power to the thermostat wires is off before touching them.
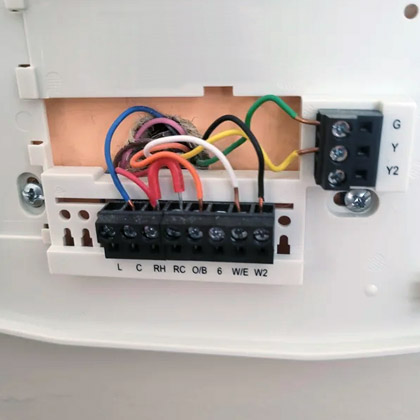
Step 2. Remove The Old Thermostat
Carefully take off the thermostat cover to expose the wiring. Most covers pop off with gentle pressure. Take a photo of the wiring before disconnecting any wires, this will serve as a helpful reference later.
Next, use the included wire labels to mark each wire according to the terminal it connects to (for example, R, W, Y, G, C). Unscrew the mounting plate and remove the old thermostat from the wall.
Step 3. Check For A C-Wire
Smart thermostats typically require a C-wire (common wire) to provide constant power. Check your wiring setup to see if one is present.
- If you have a C-wire: Great, proceed with installation.
- If you don’t have a C-wire: Some smart thermostats come with an adapter kit to create one. Alternatively, you can hire an HVAC technician, like our experts at Oliver, to add one from your furnace’s control board.
Step 4. Install The New Mounting Plate
Hold the new thermostat’s mounting plate against the wall and use a level to ensure it’s straight. Mark your screw holes with a pencil and drill pilot holes if needed. Thread the wires through the center opening, then screw the plate securely into place.
Step 5. Connect The Wires
Refer to the photo or labels you made earlier and connect each wire to the corresponding terminal on the new thermostat base. Push the wires in firmly to ensure they’re properly seated. Double-check that none of the copper ends are exposed or touching each other.
Step 6: Attach The Thermostat Display
Once the wires are in place, snap the thermostat display or faceplate onto the mounting base. Make sure it’s securely attached and sits flush against the wall.
Step 7: Restore Power and Start Setup
Turn the breaker back on to restore power to your HVAC system. The thermostat should light up and prompt you to begin the setup process.
Follow the on-screen instructions to connect the thermostat to your home’s Wi-Fi network. Then, download the manufacturer’s app on your smartphone or tablet to complete the setup. You’ll be able to control the thermostat remotely and set custom heating schedules directly from the app.
Step 8: Test Your System
After setup, test the thermostat to make sure your heating system responds correctly. Adjust the temperature up and down to confirm the furnace cycles on and off as expected.
Tips For A Smooth Installation
- Always double-check that power is off before handling wires.
- If you’re replacing an older thermostat with mercury switches, handle and dispose of it properly according to local regulations.
- Keep your old thermostat handy until you’re sure your new one is working properly.
- For best performance, mount the thermostat on an interior wall away from drafts, direct sunlight, or heat sources.
Tools Needed
- New smart thermostat
- Smartphone or tablet (for app setup)
- Screwdrivers (Phillips and flat-head)
- Drill (optional, for new mounting holes)
- Level
- Wire labels (usually included with the thermostat)
- Pencil or marker
- Electrical tape
- Small flashlight
- Voltage tester (optional but recommended)
Enjoy Smarter, More Efficient Heating
Installing a smart thermostat is one of the simplest ways to improve your home’s comfort and energy efficiency. With features like learning capabilities, remote access, and energy usage reports, these devices help you stay warm while saving on utility bills.
Instead of trying to learn how to install a smart thermostat yourself for better home heating, leave the installation to the professionals. Contact Oliver for expert thermostat replacement and setup services. Our experienced electricians will ensure your new thermostat is installed safely, configured properly, and optimized for your home’s heating system, so you can enjoy smarter comfort all season long.